Since we designed this Web site in 1994, we have been providing free online learning lessons through this online learning center. With step-by-step demonstrations, Yong Chen and his friends demonstrate their unique watercolor painting methods and techniques from start to finish.
Stay current with all the happenings at YongChen.com, with our monthly newsletter service. By joining you will enjoy these benefits, click here to learn more
Be the first one to see our painting lessons, subscribe to our Newsletter.
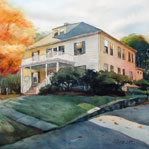 |
Medium: Watercolor Painting Lesson highlight: When the sky area was dry, I started painting the front of the house. First, I applied some yellow color to the left side of the house, and continuously washed the rest of the wall with a mixture of blue and burnt sienna. For the other side of the house next to the red maple tree, I started from the left upper corner with yellow and added more and more red towards the lower right corner of the wall....
|
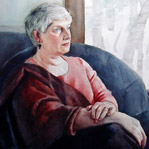 |
Medium: Watercolor Painting Lesson highlight: In this watercolor demonstration, you will learn how to step by step from gathering reference materials, sketch, to finish a watercolor portrait painting. When painting a portrait, it is most important to know the subject. To do this, I visit her in her home in order to understand her family, her personality, and listen to her stories...
|
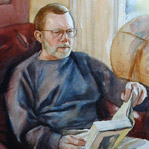 |
Medium: Watercolor Painting Lesson highlight: In this watercolor demonstration, you will learn how to start a watercolor portrait painint from "born" and "dry". I did a few preliminary drawings and decided on the final concept and design for the portrait. I also took a number of high-resolution digital photos. Back in the studio, I started the painting process by drawing a likeness of the subject, using a 2H pencil on high-quality watercolor paper.
|
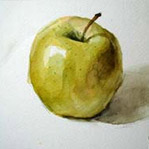 |
Medium: Watercolor Painting Lesson highlight: In this watercolor demonstration, you will learn how capture the light and shadow use a green apple. We are going to focus on the value of the color, and learn how to paint layer by layer, and step by step to build-up the value and forms.
|
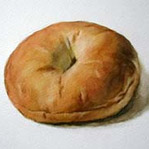 |
Medium: Watercolor Painting Lesson highlight: In this watercolor demonstration, you will learn about creating surface texture techniques. Bagels have a soft surface. In this demonstration, I will capture the feel of the skin of a bagel in the final painting, the beautiful colors and very fine details.
|
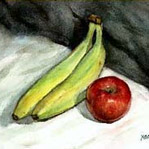 |
Painting Banana and Red Apple Watercolor Demonstration
Medium: Watercolor Painting Lesson highlight: In this watercolor demonstration, you will learn how to arrange a still-life setting for compostion with simple subjects. Composition as important as the value study in a still-life painting. In this demonstration, we are putting two subjects together in a setting. This will add a new challenge and dimension. We will see the setting as one subject and the balance between the objects in the setting as another.
|
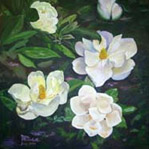 |
Painting Flowers: Step by Step Watercolor Demonstration
Medium: Watercolor Painting (This free step by step watercolor lesson provided by Mary Churchill) Tape your paper to the board with masking tape. You can either use a table and prop your board somewhat, or an upright easel. Choose a photo. (If possible), make Division marks Vertically and horizontally. Mark your paper in the same manner but use LIGHT markings ( you will want to remove these later). You may want to use this method until your drawing skills are strong to avoid frustration and a sense of failure. My students use Professional Products to avoid disappointments.
|
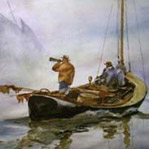 |
The Fog Horn: Watercolor Painting Demonstration
Medium: Watercolor Painting (This free step by step watercolor lesson provided by Mary Churchill) Make a strong drawing. If you have weak drawing skills, you can make Division marks vertically and horizontally with a pencil on both your photo if you are using one, and your paper. Use LIGHT markings since you will want to remove these later. There is no need to erase your drawing though. |