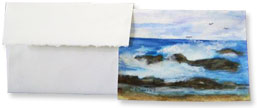
Simple Watercolor for a Gift Card
In the beginning
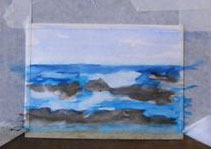
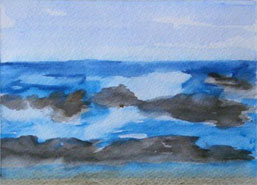
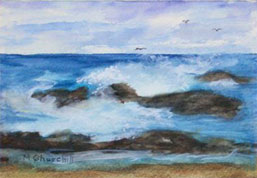
This exercise is an ocean scene with boulders in the water. Large objects in the water create noticeable signs of water movement. Water movement is energy and interest to the viewer.
We will need to soften many hard edges in the sky and water. I do that by first cleaning the paint from my brush. I use the damp brush on hard edges in a gentle scrubbing action. It is important to gently remove paint from the sea-spray /foam areas.
Materials
Watercolor paper (I use Arches brand) 5 X 10 folded in half. OR Prepackaged watercolor Cards by Strathmore, which includes envelopes ( AC Moore or Craft Store)
Brushes: 1/2 Flat # 228 red sable or a small 0 size
Paint:
French Ultramarine
Turquoise
Cobalt Blue
Cerulean Blue
Burnt Siena
Walnut Brown
I have used a Gouache (Permanent White), for ocean splash and waves at times. My materials are Acid Free.
For this project, I bought a package of Watercolor Cards by Strathmore at the Craft Store. These are 140lb. watercolor paper with envelopes. The blank cards measure 5” x 6 7/8” and the envelopes are 5 ¼” x 71/4”. I like this package very much.
At times I tape the blank card to a “field board” and put that on my table easel.
The tape will create a boarder around the edge with this method, which I’m not crazy about.
Otherwise, I will not tape the card. I will paint flat on a table in order to paint to the edge. This can be a bit of a problem because watercolor paper tends to curl a bit when wet. I have at times used a hair-dryer to prevent a curling incident.
I bought Vellum, (laser/white) at Staples. The size is 8 ½ x 11 for my computer to print my greeting. I folded a small 5/16’ piece down with a bone folder, and then glued it to the card. I run my finger down the glued strip to make the glue even and thin.
When the painting is complete, I might cut a mat, and foam-core for a backing, to enclose with the completed painting. I wrap these in brown paper which leaves the card in its envelope, signed and addressed, separate. I enclose these together in a brown envelope for mailing. The recipient will frame their card-painting which is now a painting gift.
At times I will enclose only the mat and a same size sheet of watercolor paper for the back of the painting if I’ve used Arches watercolor paper because it is acid free.
They will buy their own frame which needs glass. Size: 8 ½ x 10
They will tape the entire card on to the back of the mat with a Paper Tape from the Pharmacy. One inch Johnson & Johnson in the First Aid section.
Mat, Foam-Core and Frame are all size: 8” x 10”
Mat opening: 4 12/16” x 6 9/16”
Painting
Sketch the horizontal line to separate sky from ocean. Sketch in the boulders. Mark placement for beach. Rough in the foam/spray where you want that. Lastly, sketch in three seagulls.
Make sure to use tape to separate sky from back of card, using masking tape. This will create a clean edge between paper and painting.
Start painting sky with blues and violet. Leave a bit of white for clouds. The dark part of sky is at the top right. Remember the sky moves in one direction. I used the hair-dryer to dry the sky before I started the ocean, so they don’t run and blend into each other.
The ocean is darker on the horizon line. I like flat brushes for oceans because I paint the ocean in strokes. The breaks in paint suggest movement.
While the blue dries, I paint the rocks and then the beach.
Next is to soften hard edges with a damp brush, which I clean again and again.
Finally, the wave-spray areas must be cleaned of paint, some areas lightly and other places more thoroughly.
When all is completed, paint in the (3) seagulls.
Watercolor usually needs a couple coats to give depth and richness.
And lastly…. Always keep your water clean!
This free lesson provided by Mary Churchill