Watercolor Process of a Still Life
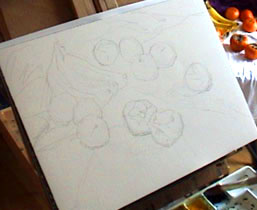
Still-life setting and drawing
After I spent enough time arranging my still-life setting, I started from a drawing to define the space and shapes of each subject.
In the process of setting up, I have already spent time thinking through the concept, the mood, the space (include the negative space), and how the colors would work together. In the drawing step, I did a final evaluation of the setting till I was completely satisfied with the arrangement.
Would you like to see how I prepared the setting for this watercolor still-life painting? See the end of this article.
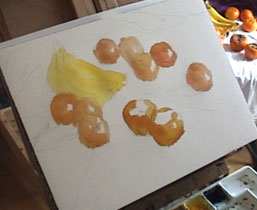
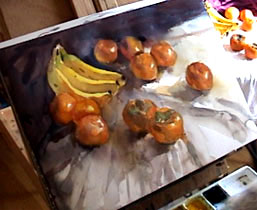
Start from the main subjects
There are a number of ways to begin a watercolor painting. In this demonstration, I started the painting from the main subjects which are the bananas, the mandarin oranges and the persimmons.
I first put yellow into the area for the bananas, then I mixed yellows and reds to define the areas for the mandarin oranges and the two persimmons. As you may noticed, I left some blank areas within the oranges and the persimmons which will be used for the highlights and leaves of the fruits.
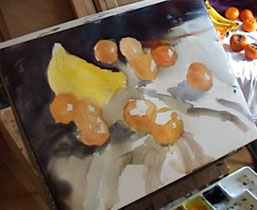
Balance the dark and the light areas
Next I worked on the light and dark areas of the painting (The fabrics used in the background and the foreground) and worked to develop the color and value relationship between the major areas. This was the time to orchestrate the overall harmony of the watercolor painting.
I used a large brush to wash the top and left dark fabric areas with a mixture of blue, red and burnt sienna. In the light-color fabric area I mixed burnt umber and yellow with good amount of water to paint the shadows.
I squinted my eyes when I looked at the still-life setting so that I would avoid noticing the small details, thus keeping my focus on the balance of the major areas of the painting. Each wash and stroke on the painting needed to work together to bring out the concept and impression of the painting that I had developed in my mind while creating the initial setting. I next worked on introducing more colors and value balance to bring more life to this watercolor still-life painting.
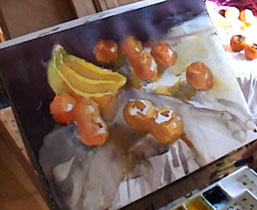
Bring the subjects to life
When I have accomplished the overall dark and light value and color balance, I started to work on the form of the main subjects.
I started from the bananas, then proceeded to the mandarin oranges on the right, then the ones on the left, and finally the persimmons at the front. This was the time to enrich the colors of the subjects by defining the light and shadow. During this step, I paid close attention to the reflective colors from other subjects in the setting. As I developed a richer relationship among the subjects, I moved the color and value balance to the next level. I avoided staring at an object for too long, because what I was working on was the relationship and balance.
Proceed to details
I continued adding colors to the different areas of the composition one layer at a time, As I change one element, another would strike me as needing refinement. This became a continual process as I matched up the watercolor painting to my minds eye. This was how I could make the painting more detailed, interesting, and achieve a certain perfection.
This was the time to push the painting to fullness. I worked on defining the darkest area, the brightest area and other areas in between, to complete the balance.
This painting was completed in about one and a half hours.